Micropython on Adafruit Huzzah esp8266
Installation
- Download micropython firmware for esp8266
Go to http://micropython.org/download#esp8266 and download the stable firmware file of the board (for example: esp8266-20171101-v1.9.3.bin).
- Install esptool
We need to install esptool to flash the firmware from the computer to the esp8266 board. We use the python pip to install the esptool with the following command:
pip install esptool
Or
python -m pip install esptool
- Using esptool to erase the flash on device
Once we install the esptool, we can use the esptool.py to erase the flash with the command:
esptool.py --port /dev/ttyUSB0 erase_flash
Or for Windows with com serial port: com + port number
esptool.py --port com4 erase_flash
- Flashing the firmware
Open command line terminal. Change to directory that we store the downloaded firmware. Execute the following:
esptool.py --port /dev/ttyUSB0 --baud 460800 write_flash --flash_size=detect 0 esp8266-20171101-v1.9.3.bin
Or on Windows using com serial port:
esptool.py --port com4 --baud 460800 write_flash --flash_size=detect 0 esp8266-20171101-v1.9.3.bin
Micropython REPL
- Using Putty on Windows
- Download and install Putty from: https://www.chiark.greenend.org.uk/~sgtatham/putty/latest.html
- Open putty.exe to start the program
- Click on Serial
- Enter Serial Line port (for example COM4)
- Change the Serial Speed to 115200. It is the default speed for micropython REPL
- Click Open
Note: to see which com port the device is on in windows. We can:
- Connect the device via usb cable
- Open device manager.
- Click on Ports (COM & LPT)
- The Device will be list with Name and port number
The boots files and code upload
/boot.py and /main.py files
There are two important files that MicroPython looks for in the root of its filesystem. These files contain MicroPython code that will be executed whenever the board is powered up or reset (i.e. it 'boots'). These files are:
- /boot.py: This file is run first on power up/reset and should contain low-level code that sets up the board to finish booting. You typically don't need to modify boot.py unless you're customizing or modifying MicroPython itself.
- /main.py: If this file exists it's run after boot.py and should contain any main script that you want to run when the board is powered up or reset.
The main.py script is what you can use to have your own code run whenever a MicroPython board powers up. Just like how an Arduino sketch runs whenever the Arduino board has power, writing a main.py to a MicroPython board will run that code whenever the MicroPython board has power.
=== Using "ampy" to upload file
- Install Adafruit ampy
We can use pip to install the ampy with the command:
pip install adafruit-ampy
Once installed, we can verify by running the help command in the command line terminal:
ampy --help
- Upload code using ampy "put" command
Now that we have ampy installed. We can try to create a simple file that print out number. And upload it to the board.
- Create a file name test.py on any directory in the computer with the following code:
###########################################################################
# Setup code goes below, this is called once at the start of the program: #
###########################################################################
import time
print('Hello world! I can count:')
i = 1

while True:
    ###################################################################
    # Loop code goes inside the loop here, this is called repeatedly: #
    ###################################################################
    print(i)
    i += 1
    time.sleep(1.0)  # Delay for 1 second.
Then copy the file to /main.py on a connected MicroPython board with ampy's put command:
ampy --port /serial/port put test.py /main.py
Or:
ampy --port COM4 put test.py /main.py
Once the file is uploaded to the /main.py file. We can reset the board. Use putty the access the micropython REPL. And see the output of the program print on the Serial terminal.

Note: If putty serial is open. ampy can fail to access the board and unable to upload the code.
Control GPIO
The official document for Micropython GPIO Pins is available at: https://docs.micropython.org/en/latest/esp8266/esp8266/tutorial/pins.html
The way to connect your board to the external world, and control other components, is through the GPIO pins. Not all pins are available to use, in most cases only pins 0, 2, 4, 5, 12, 13, 14, 15, and 16 can be used.
The pins are available in the machine module, so make sure you import that first.
import machine
Then you can create a pin using:
pin = machine.Pin(0)
Here, the “0” is the pin that you want to access. Usually you want to configure the pin to be input or output, and you do this when constructing it. To make an input pin use:
pin = machine.Pin(0, machine.Pin.IN, machine.Pin.PULL_UP)
You can either use PULL_UP or None for the input pull-mode. If it’s not specified then it defaults to None, which is no pull resistor. You can read the value on the pin using:
pin.value()
The pin on your board may return 0 or 1 here, depending on what it’s connected to. To make an output pin use:
pin = machine.Pin(0, machine.Pin.OUT)
Then set its value using:
pin.value(0)
pin.value(1)
Or:
pin.off()
pin.on()
- The buildin red led on Adafruit Huzzah is on pin 0. And is reverse, we can turn it on with following code:
import macine
pin = machine.Pin(0, machine.Pin.OUT)
pin.off()
Connect to WiFi
The official document for network basic is available at: https://docs.micropython.org/en/latest/esp8266/esp8266/tutorial/network_basics.html?highlight=wifi
We need to import the network module:
import network
Then initialize as Sation mode:
sta_if = network.WLAN(network.STA_IF)
Activate the station interface:
sta_if.active(True)
Connect to WiFi network:
sta_if.connect('<your ESSID>', '<your password>')
Finally, we can check if weather or not it is connected:
sta_if.isconnected()
And check IP address with:
sta_if.ifconfig()
MQTT
Once we have connected to the network. We can use MQTT to subscribe to the MQTT broker.
- import the MQTTClient from umqtt.simple module
from umqtt.simple import MQTTClient
import time
- create a callback function to print the subscribed message:
def sub_cb(topic, msg):
   print((topic, msg))
- Initialize client:
c = MQTTClient('umqtt_client123', '138.48.33.164')
- Set callback function:
c.set_callback(sub_cb)
- Connect to broker
c.connect()
- Subscribe to topic:
c.subscribe('foo_topic')
- Loop to check for message:
while True:
   c.check_msg()
time.sleep(1) Or with blocking:
while True:
   c.wait_msg()
- If we want to publish, we can follow this example:
from umqtt.simple import MQTTClient
c = MQTTClient("umqtt_client", server)
c.connect()
c.publish("foo_topic", "hello")
c.disconnect()
Additional example of using umqtt is available at: https://github.com/micropython/micropython-lib/tree/master/umqtt.simple
DHT Sensor
We can use the module dht in micropython to measure and get the temperature and humidity from dht sensor.
We will use DHT22 sensor. More information about how to connect DHT22 is available here: https://learn.adafruit.com/dht/connecting-to-a-dhtxx-sensor DHT22 Library Document: http://docs.micropython.org/en/latest/esp8266/esp8266/tutorial/dht.html
- Connecting the wire:
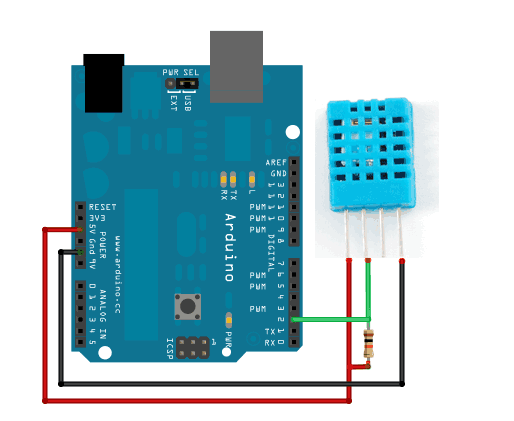
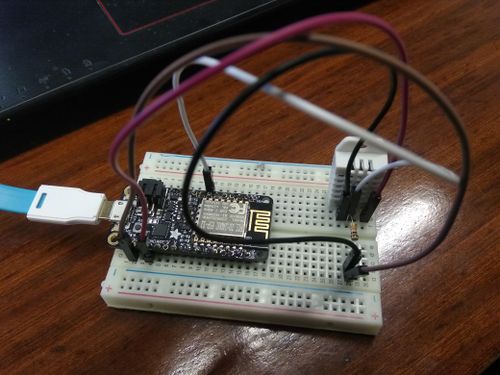
There are 4 Pins on DHT22. But we only use 3 Pin:
- The first pin is VCC Pin. We connect it to 3v Pin on Huzzah to power the sensor.
- The sencond pin is data Pin. We connect it to Pin 13 on Huzzah in this example.
- The last Pin (The fourth Pin, We skip the third Pin) is connected to the ground.
- We also need to connect 10 Kohm resistor between VCC and the data pin. to act as a medium-strength pull up on the data line.
- Reading Temperature and Humidity Value:
Once we connected the wire. We can connect the board to the computer. Open putty to access micropython REPL.
Then import the dht and machine module with:
import dht, machine
Initialize the dht22 variable with Pin 13
dht22 = dht.DHT22(machine.Pin(13))
Run the measure function
dht22.measure()
Print out temperature value:
print(dht22.temperature())
Print out humidity value:
print(dht22.humidity())
References
Getting started with MicroPython on the ESP8266: https://docs.micropython.org/en/latest/esp8266/esp8266/tutorial/intro.html
Adafruit Micropython Basic: https://learn.adafruit.com/micropython-basics-load-files-and-run-code/install-ampy?view=all
Adafruit Micropython Boot Script: https://learn.adafruit.com/micropython-basics-load-files-and-run-code/boot-scripts
Adafruit ampy file operations: https://learn.adafruit.com/micropython-basics-load-files-and-run-code/file-operations
umqtt github: https://github.com/micropython/micropython-lib/tree/master/umqtt.simple
micropython-lib github: https://github.com/micropython/micropython-lib
Temperature and Humidity: http://docs.micropython.org/en/latest/esp8266/esp8266/tutorial/dht.html


