Custom GAP advertising packet: Difference between revisions
| Line 253: | Line 253: | ||
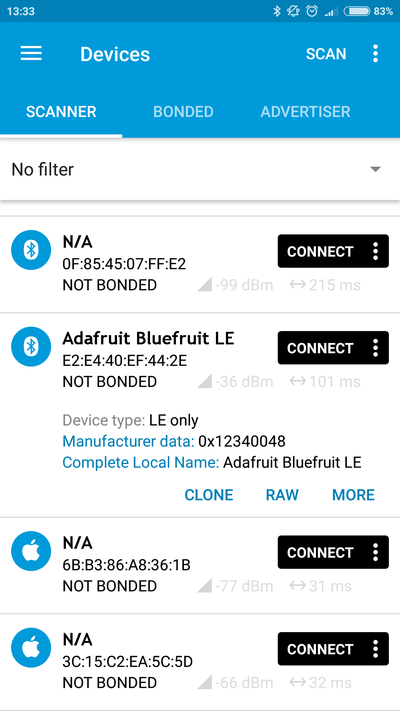
We can also use the nRF Connect for Mobile app to scan and see the example data as in screenshot below: https://play.google.com/store/apps/details?id=no.nordicsemi.android.mcp | We can also use the nRF Connect for Mobile app to scan and see the example data as in screenshot below: https://play.google.com/store/apps/details?id=no.nordicsemi.android.mcp | ||
[[File:nrf_connect_sc.png]] | [[File:nrf_connect_sc.png| 400px]] | ||
== Reference == | == Reference == | ||
Latest revision as of 12:39, 15 December 2017
We can change the content of the generic access profile (GAP) advertising packet (AP) to contain the information we want it to contain. If we have only a small amount of data we want to communicate to the world, then we can use the modified GAP AP to send that information to any BLE scanner, without waiting for it to establish a connection. In this article, we’re going to modify advertising data step by step, then receive the result with a custom-built Evothings app.
GAP data review
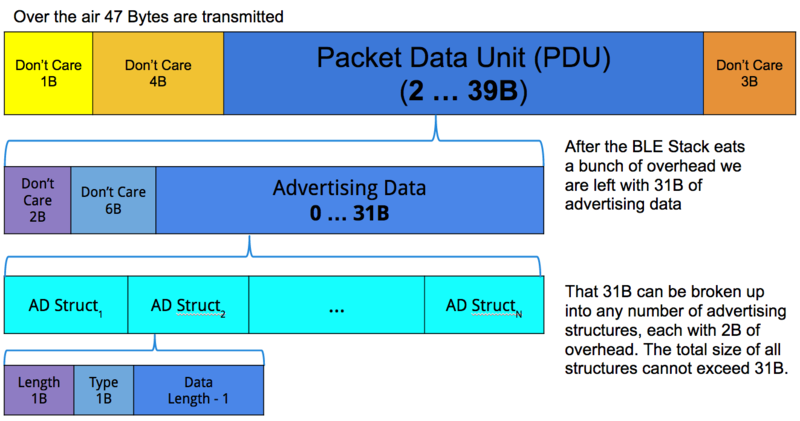
The general GAP broadcast’s data breakdown is illustrated in this diagram:
The BLE stack eats part of our package’s 47B, so only 26B are available for our data
Every BLE package can contain a maximum of 47 bytes (which isn’t much), but:
- The BLE stack requires 8 bytes (1 + 4 + 3) for its own purposes.
- The advertising packet data unit (PDU) therefore has at maximum 39 bytes. But the BLE stack once again requires some overhead, taking up another 8 bytes (2 + 6).
- The PDU’s advertising data field has 31 bytes left, divided into advertising data (AD) structures. Then:
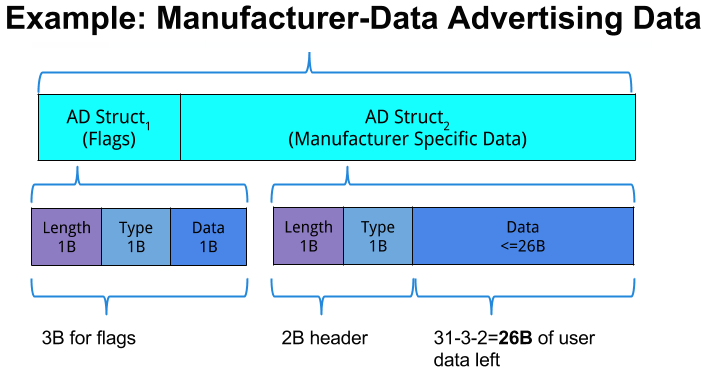
- The GAP broadcast must contain flags that tell the device about the type of advertisement we’re sending. The flag structure uses three bytes in total: one for data length, one for data type and one for the data itself. The reason we need the first two bytes (the data length and type indications) is to help the parser work correctly with our flag information. We have 28 bytes left.
- Now we’re finally sending our own data in its own data structure. But our own data structure also needs an indication of length and type (two bytes in total). So we have 26 bytes left.
All of which means that we have only 26B to use for the data we want to send over GAP.
And here’s what the bottom two layers of structure look like for our particular example - sending manufacturer data:
The example we use here only requires two data structures, one of 3B, one of 28B (of which two are used for data length and type indications)
Example Custom GAP data on Arduino (Adafruit Bluefruit LE feather 32u4)
The example code use the library from Adafruit Bluefruite LE nRF51: https://github.com/adafruit/Adafruit_BluefruitLE_nRF51
Begin by create a file call BlueFruitConfig.h which define all the configuration need for the device
- BlueFruitConfig.h
#define BUFSIZE                        128   // Size of the read buffer for incoming data
#define VERBOSE_MODE                   true  // If set to 'true' enables debug output

#define BLUEFRUIT_SWUART_RXD_PIN       9    // Required for software serial!
#define BLUEFRUIT_SWUART_TXD_PIN       10   // Required for software serial!
#define BLUEFRUIT_UART_CTS_PIN         11   // Required for software serial!
#define BLUEFRUIT_UART_RTS_PIN         -1   // Optional, set to -1 if unused

#ifdef Serial1    // this makes it not complain on compilation if there's no Serial1
  #define BLUEFRUIT_HWSERIAL_NAME      Serial1
#endif

#define BLUEFRUIT_UART_MODE_PIN        12    // Set to -1 if unused

#define BLUEFRUIT_SPI_CS               8
#define BLUEFRUIT_SPI_IRQ              7
#define BLUEFRUIT_SPI_RST              4    // Optional but recommended, set to -1 if unused

#define BLUEFRUIT_SPI_SCK              13
#define BLUEFRUIT_SPI_MISO             12
#define BLUEFRUIT_SPI_MOSI             11
Our Arduino .ino file begin with including the Bluefruit LE library and the BluefruitConfig.h file
#include <Arduino.h>
#include <SPI.h>
#include "Adafruit_BLE.h"
#include "Adafruit_BluefruitLE_SPI.h"
#include "Adafruit_BluefruitLE_UART.h"

#include "BluefruitConfig.h"
And some configuration and a helper function
#if SOFTWARE_SERIAL_AVAILABLE
  #include <SoftwareSerial.h>
#endif

#define FACTORYRESET_ENABLE 1

/* ...hardware SPI, using SCK/MOSI/MISO hardware SPI pins and then user selected CS/IRQ/RST */
Adafruit_BluefruitLE_SPI ble(BLUEFRUIT_SPI_CS, BLUEFRUIT_SPI_IRQ, BLUEFRUIT_SPI_RST);

// A small helper
void error(const __FlashStringHelper*err) {
  Serial.println(err);
  while (1);
}
The setup function will begin the serial, initialize BLE module, perform factory reset, and print out some BLE device information
void setup() {
  // put your setup code here, to run once:
  Serial.begin(115200);
  Serial.println(F("Begin"));

  /* Initialise the module */
  Serial.print(F("Initialising the Bluefruit LE module: "));
  if ( !ble.begin(VERBOSE_MODE) )
  {
    error(F("Couldn't find Bluefruit, make sure it's in CoMmanD mode & check wiring?"));
  }
  Serial.println( F("OK!") );

  if ( FACTORYRESET_ENABLE )
  {
    /* Perform a factory reset to make sure everything is in a known state */
    Serial.println(F("Performing a factory reset: "));
    if ( ! ble.factoryReset() ){
      error(F("Couldn't factory reset"));
    }
  }

  Serial.println("Requesting Bluefruit info:");
  /* Print Bluefruit information */
  ble.info();
  ble.println(F("AT+GAPSTOPADV"));
}
The loop function will generate a random value between 50 and 100, set those random value in GAP advertising package as Manufacturer data, and broadcast the advertising data for 1 second. After that the device stop advertising for 5 second and then repeat the process. The value in GAPSETADVDATA command is 05-ff-12-34-00-xx, We use 12-34 as the Manufacturer ID for our application.
- 05: is length of the data, indicate our first data is 5 bytes
- ff: is the data type value defined by BLE specification, indicate the data is Manufacturer DATA
- 12-34: is the Manufacturer ID, the length of Manufacturer ID is 2 bytes
- 00-xx: is the data we want to broadcast, we use random value here as an example
For more information about GAP data type. See BLE Core Specification Supplement
void loop() {
  // put your main code here, to run repeatedly:
  int randomVal = random(50, 100);
  ble.print( F("AT+GAPSETADVDATA=05-FF-12-34-00-") );
  ble.println(randomVal, HEX);

  // Check response status
  if ( !ble.waitForOK() )
  {
    Serial.println(F("Failed to get response!"));
  }
  ble.println(F("AT+GAPSTARTADV"));
  delay(1000);
  ble.println(F("AT+GAPSTOPADV"));
  delay(5000);
}
The complete code for the custom_adv.ino file:
#include <Arduino.h>
#include <SPI.h>
#include "Adafruit_BLE.h"
#include "Adafruit_BluefruitLE_SPI.h"
#include "Adafruit_BluefruitLE_UART.h"

#include "BluefruitConfig.h"

#if SOFTWARE_SERIAL_AVAILABLE
  #include <SoftwareSerial.h>
#endif

#define FACTORYRESET_ENABLE 1

/* ...hardware SPI, using SCK/MOSI/MISO hardware SPI pins and then user selected CS/IRQ/RST */
Adafruit_BluefruitLE_SPI ble(BLUEFRUIT_SPI_CS, BLUEFRUIT_SPI_IRQ, BLUEFRUIT_SPI_RST);

// A small helper
void error(const __FlashStringHelper*err) {
  Serial.println(err);
  while (1);
}

void setup() {
  // put your setup code here, to run once:
  Serial.begin(115200);
  Serial.println(F("Begin"));

  /* Initialise the module */
  Serial.print(F("Initialising the Bluefruit LE module: "));
  if ( !ble.begin(VERBOSE_MODE) )
  {
    error(F("Couldn't find Bluefruit, make sure it's in CoMmanD mode & check wiring?"));
  }
  Serial.println( F("OK!") );

  if ( FACTORYRESET_ENABLE )
  {
    /* Perform a factory reset to make sure everything is in a known state */
    Serial.println(F("Performing a factory reset: "));
    if ( ! ble.factoryReset() ){
      error(F("Couldn't factory reset"));
    }
  }

  Serial.println("Requesting Bluefruit info:");
  /* Print Bluefruit information */
  ble.info();
  ble.println(F("AT+GAPSTOPADV"));
}

void loop() {
  // put your main code here, to run repeatedly:
  int randomVal = random(50, 100);
  ble.print( F("AT+GAPSETADVDATA=05-FF-12-34-00-") );
  ble.println(randomVal, HEX);

  // Check response status
  if ( !ble.waitForOK() )
  {
    Serial.println(F("Failed to get response!"));
  }
  ble.println(F("AT+GAPSTARTADV"));
  delay(1000);
  ble.println(F("AT+GAPSTOPADV"));
  delay(5000);
}
Example Scan Program on Raspberry Pi (Using bluepy library)
We use the "bluepy" library: https://github.com/IanHarvey/bluepy/
We start by import the class from the library:
from bluepy.btle import Scanner, DefaultDelegate
We create a ScanDelegate subclass of DefaultDelegate to handle the discovered scan data. Our handleDiscovery function print out the value from the Manufacturer data we set in the device. We check the Manufacturer ID to make sure we only print the data from our device that use the ID.
class ScanDelegate(DefaultDelegate):
    def __init__(self):
        DefaultDelegate.__init__(self)

    def handleDiscovery(self, dev, isNewDev, isNewData):
        if isNewData:
            for (adtype, desc, value) in dev.getScanData():
                if desc == 'Manufacturer' and value.startswith('1234' ):
                    print(value[4:])
We initialize the scanner variable with our ScanDelegate to handle the discovery call back.
scanner = Scanner().withDelegate(ScanDelegate())
while True:
    scanner.scan(5)
The complete code is as following, we can create a .py file to store and code and run it with command sudo python main.py if the file name is main.py
from bluepy.btle import Scanner, DefaultDelegate

class ScanDelegate(DefaultDelegate):
    def __init__(self):
        DefaultDelegate.__init__(self)

    def handleDiscovery(self, dev, isNewDev, isNewData):
        if isNewData:
            for (adtype, desc, value) in dev.getScanData():
                if desc == 'Manufacturer' and value.startswith('1234' ):
                    print(value[4:])

scanner = Scanner().withDelegate(ScanDelegate())
while True:
    scanner.scan(5)
The screenshot of example output
We can also use the nRF Connect for Mobile app to scan and see the example data as in screenshot below: https://play.google.com/store/apps/details?id=no.nordicsemi.android.mcp
Reference
Custom GAP Advertising Package https://docs.mbed.com/docs/ble-intros/en/latest/Advanced/CustomGAP/
Adafruit feather 32u4 BLE GAP https://learn.adafruit.com/adafruit-feather-32u4-bluefruit-le/ble-gap
Bluepy Scanner Class http://ianharvey.github.io/bluepy-doc/scanner.html


